
For the services I’m hosting at home I wanted an internal domain to make accessing those services easier. Because no one likes remembering IP addresses.
There are multiple suitable DNS servers on the market that you could implement that would get you there. However, I had a few added ‘wants’ that led me to PowerDNS.
Requirements
- Support for multiple backends (I’m using sqlite for the record)
- An HTTP API (SOAP would have been fine, REST using JSON is ideal)
- Support for exporting metrics (Bit overkill for a home environment, but it’s good practice)
- Support for Dynamic DNS Updates (RFC2136)
- Ability to perform recursive lookups to external domains.
PowerDNS does it all, kinda
PowerDNS Authoritative Server on its own ticks 4/5 boxes. As an Authoritative DNS server it does not support recursive lookups, it used to, but they split that into a separate product a long time ago. Personally I think that’s a good thing as the pieces of software, while both carrying the PowerDNS name, serve completely different purposes.
Alas, we want recursion. When running the PowerDNS authoritative server it only makes sense that we use the PowerDNS Recursor as well. Recursor allows you to send requests to specific server depending on the domain. Of course, you’re free to swap this out with Bind or whatever you want. However, Recursor does not allow you to forward Dynamic DNS Updates messages to the authoritative server. For that we’ll need another piece of software…
Last but not least, also developed by the people behind PowerDNS, dnsdist enters the system. Quite a clever bit of software that acts as a DNS load balancer. You can route or modify DNS packets based on pretty much any of their attributes and its configuration is written in Lua. Using a programming language as configuration tool does increase the learning curve, but it is hella flexible.
My Set-up
Considerations
Choice of host
For my DNS needs it seemed like a bad idea to host the services as a virtual machine on my Proxmox server as it might end up creating a circular dependency.
Luckily, I still have my Raspberry Pi 3B which up until now has maybe seen up to a few hours of usage. It’s an 64-bit ARM device which is good because they’re dropping 32-bit ARM support as soon as the last supported version (4.4.x) hits EOL (Which it did on the 20th of October 2022 lol).
So about that 64-bit ARM support…
PowerDNS doesn’t have builds for 64-bit ARM yet. If you’re running on bare Pi you’re stuck on the 32-bit version of version 4.4 which is EOL. They are working on 64-bit builds, however. You can of course opt to run PowerDNS in Docker, but I felt that added some operational overhead I didn’t want at this stage.
Sockets
PowerDNS Authoritative Server, PowerDNS Recursor and dnsdist are not usually going to be running on the same host, and they all expect to be the sole DNS service.
This also means that they’re all going to want to live on port 53 because they’re designed to handle DNS queries.
If you know a thing or two about sockets you know you can’t have two processes listening on the same socket. They wouldn’t be able to determine who the data is for, anyway.
Luckily each of them allows you to set the socket the run on and dnsdist doesn’t care what ports your backend run on.
The current situation
In the end my set-up looks like this:
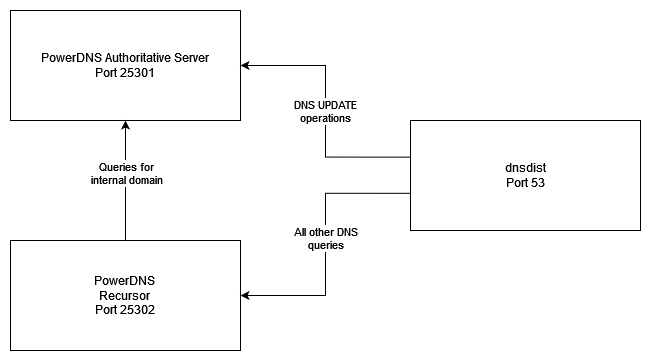
Dnsdist has port 53 on the host and is listening for DNS queries from elsewhere on my network, currently all devices using DHCP use the pi (and dnsdist) as main DNS.
PowerDNS Authoritative server only listens locally on port 25301, ditto for Recursor with port 25302 instead. This way all traffic has to pass through dnsdist.
Configuration files
My configuration files are as follows:
PowerDNS Authoritative server
As you can see this configuration also enables the web server and API in the authoritative web server, you can set these to no as they’re not required for our goal.
|
|
PowerDNS Recursor
Just a simple configuration here, everything for test.lan gets routed to our local authoritative server on port 25301 and the other zones go to Cloudflare public DNS.
|
|
Dnsdist
Dnsdist uses Lua for its configuration, it has a bit of a learning curve and the nesting of rules can get confusing quick. If you want some seriously different rules definitely check out the official documentation on Packet policies
|
|
Within the dnsdist CLI you can issue the showServers() function, and it’ll happily spit out the backends it knows about:
|
|
Configuring your domain
Let’s go through some PowerDNS basics shall we. During set-up, we’ve configured the PowerDNS Recursor to forward requests for test.lan to the authoritative nameserver. We’ve also configured DNS to allow certain IP addresses to send Dynamic DNS Updates commands to the authoritative server. However, the server doesn’t know about the domain yet. Let’s get to work.
Add your domain to PowerDNS
Adding a new zone to PowerDNS really is as simple as the following command
|
|
To be proper I also add an NS record and an A record pointing at the DNS server
|
|
After that you can list the zone and should see something like the following
|
|
Generating and allowing a TSIG key
RFC2136 specifies that Dynamic DNS Updates operations should use a TSIG (Transaction SIGnature) key to sign zone updates.
In PowerDNS Authoritative server you can generate a key and add it to your zone’s metadata to allow updates. For this you use the following commands.
|
|
Testing Dynamic DNS Updates
To see if we have succeeded in configuring the server we can use the nsupdate utility. In Ubuntu this comes from the bind9-dnsutils package.
nsupdate opens a prompt that is used to build your message, usually this would look a little like
|
|
key is key algorithm:keyname secret. This is not particularly clear in the man-page for nsupdate.
algorithm defaults to hmac-md5 unless it’s been disabled in which case it defaults to hmac-sha256. In short, save yourself the hassle and just specify it. Unless the software performing your updates is outdated it’s worth going with hmac-sha512 anyway.
Sending the message does not give you any feedback if it went correctly. You can use the show command to see the message BEFORE it’s sent:
|
|
Given the command does not give you any feedback, use quit to exit the prompt and ask the DNS server for your newly created record with dig:
|
|
Hurrah!
You’ve made it to the end. Take a breather and pat yourself on the back. PowerDNS consists of quite cool pieces of software. You can tell that dnsdist was built to be flexible and fast rather than user-friendly but we got there in the end. As a next step you might want to look into utilizing the API in the different PowerDNS programs if you really want to up your automation game.